Remember when consoles weren't glorified PCs? The 1999 Sega Dreamcast remembers. Sega's final console and introduced on "9/9/99 for $199" before the Sony PlayStation 2 hype machine overwhelmed it, it came on the heels of the Saturn, which had sophisticated hardware but was difficult to program and Sega lost millions on manufacturing them. In some ways the Dreamcast is the Saturn done right: the same SuperH architecture, just way faster (instead of dual SH-2s at 28.6MHz, one big SH-4 at 200MHz), a more conventional GPU (rather than the odd 3D VDP of the Saturn which used quads instead of triangles), and a straightforward uniprocessor design instead of the Saturn's sometimes rickety dual CPU bus. It was also much cheaper to manufacture even considering its use of the Yamaha GD-ROM format; nothing else supported it, but it stored up to a gigabyte and was backwards compatible with CDs.
However, the Dreamcast was also not very future-proofed as it was the only fifth-generation console not to use DVD format (even the "mini" discs of the GameCube stored more), and Sega's attempt to outrun Sony and Nintendo's new offerings with deep discounts only served to make the console unprofitable faster. Sega announced the discontinuation of the Dreamcast on March 31, 2001, and slashed the cost to $99. I'd heard good things about it, I'd played Crazy Taxi in the arcades, and there it was at Fry's (rest in peace) at a price I could afford as a starving student, so I picked one up. Games turned up in quantity at lower prices and I even managed to land a Broadband Adapter and a keyboard and a light gun and a mouse and the Seaman microphone and even the fishing reel controller. There's also an SD card reader plugged into the back expansion port I can play disk images off.
Although I've picked up a couple other Dreamcast and Dreamcast-adjacent systems since, I still have the original one in my office. Its internal battery used for storing settings had long since worn out, requiring me to enter the date and time every time I wanted to play a game, but then it wouldn't read any discs other than SoulCaliber. I mean, I like SoulCaliber, but this was ridiculous. No Crazy Taxi? It's time for ... a Refurb Weekend!
... after we play a game of SoulCaliber.
We have two primary tasks today: we're going to replace the internal battery with a new one, and then we're going to adjust the optical drive's laser pickup to get discs reading again. Both of these issues are common faults on Dreamcasts after a certain period of time.
Fortunately, the DC is easy to get into. We take off the BBA (or modem) and remove four Phillips screws, one in the expansion area, and then three recessed ones in the corners.
I should note before going further that this unit is an NTSC version 1, manufactured May 2000 (before Sega locked out MIL-CDs with a drive update). I have never worked on a PAL system. The NTSC version 2 is similar to the version 1, but the version 0 (earliest) has some differences in its cooling and internals. You can note the television standard and revision on the bottom; the circled number next to "PAL" or "NTSC" is the revision.
With the screws out, we turn the DC back over, and the entire top lifts right off (make sure you don't have a disc in!). It's a little more work to get down to the actual logic board, but fortunately the two items we need to address today can be dealt with right here.
The battery is on the controller board at the front of the unit. The controller board not only is where your controllers and other Maple bus peripherals like the keyboard attach, but also carries the fuse (a big resistor-like thing at R1), the main orange power LED, and the power terminals for the cooling fan. This board is attached to the base with four Phillips screws, two on the side and two in the middle.
We then free the board from the bottom by popping it out of the front shell and the clasps under it (a nylon spudger works well as a prybar).
The settings battery is a small rechargeable 3V ML2020 (here with a lavender rim) that is permanently affixed to its holder, and the holder is soldered into the board.
Fortunately even for a soldering idiot like me, this is a very easy job. The holder is through-hole, not surface mount, and you just need to de-solder in three points. The apex of the triangle is where the blob of lacquer is in this picture; the other two vertices are below it.
We'll replace it with an ML2032, which is the same form factor as the reproduces-in-desk-drawers-except-when-you-need-one CR2032 except that it's rechargeable. You can't use a regular CR2032 here but fortunately ML2032's are also fairly common and not very expensive. To make future repairs easier we'll solder in a proper holder. This is a common enough problem that you can even get these kits on eBay for a couple bucks that match the holes on the controller board almost exactly.
Heating up the points and pulling the old battery out. You can remove the solder if you like, but you can also just use it for the holder we're putting in. There's really nothing you can hurt on this board that can't be repaired. It's a great DIY project to get used to basic soldering/desoldering work.
The new holder goes in the same orientation. If you've done it right, connect your voltmeter's negative to the apex and positive to the right of the two vertices and you should measure roughly 3 volts.
Then put the board back in and check your work. The battery should be fully or at least mostly charged, so after setting the time once more, it should remember it.
If your DC suddenly doesn't power up after this, there are a couple possibilities, and the least likely is that you did the soldering work wrong. If the power light comes on at least, and/or you hear a beep from a connected VMU, odds are the controller board isn't the problem. Even if you're incredibly careless, as long as you're not doing something like laying the entire board on the soldering iron the worst you can do is wreck the lines going to controller port 1, and even that you'd have to work at.
If it powers up sometimes and then shuts off after a few seconds, either the ribbon cable or the fan connector are at fault. If the fan isn't spinning, the Dreamcast hardware will force a shutdown to prevent thermal damage after a few seconds. Assuming the fan is correctly connected you'll need to replace the fan and/or consider this modification. If the fan is spinning, next look at the ribbon cable. I managed to damage one by shorting pin 1 to pin 2, which connected the 3 volts from the battery into the controller line and freaked out the console. I repaired it by carefully bending the metal contact back and reseating the ribbon, and no harm was done. If the cable looks intact, however, you may need to consider that same modification as a test.

The next part involves adjusting the laser pickup. GD-ROMs aren't getting any younger and like all laser LEDs they dim and burn out with time, but no one's making them anymore. It might be possible to replace just the LED but my board-level solder-fu isn't hot enough for that yet. (I do have a new-in-box GD-ROM with a brand new laser and pickup but I'm saving it until I absolutely can't get any more out of the drives I have.)
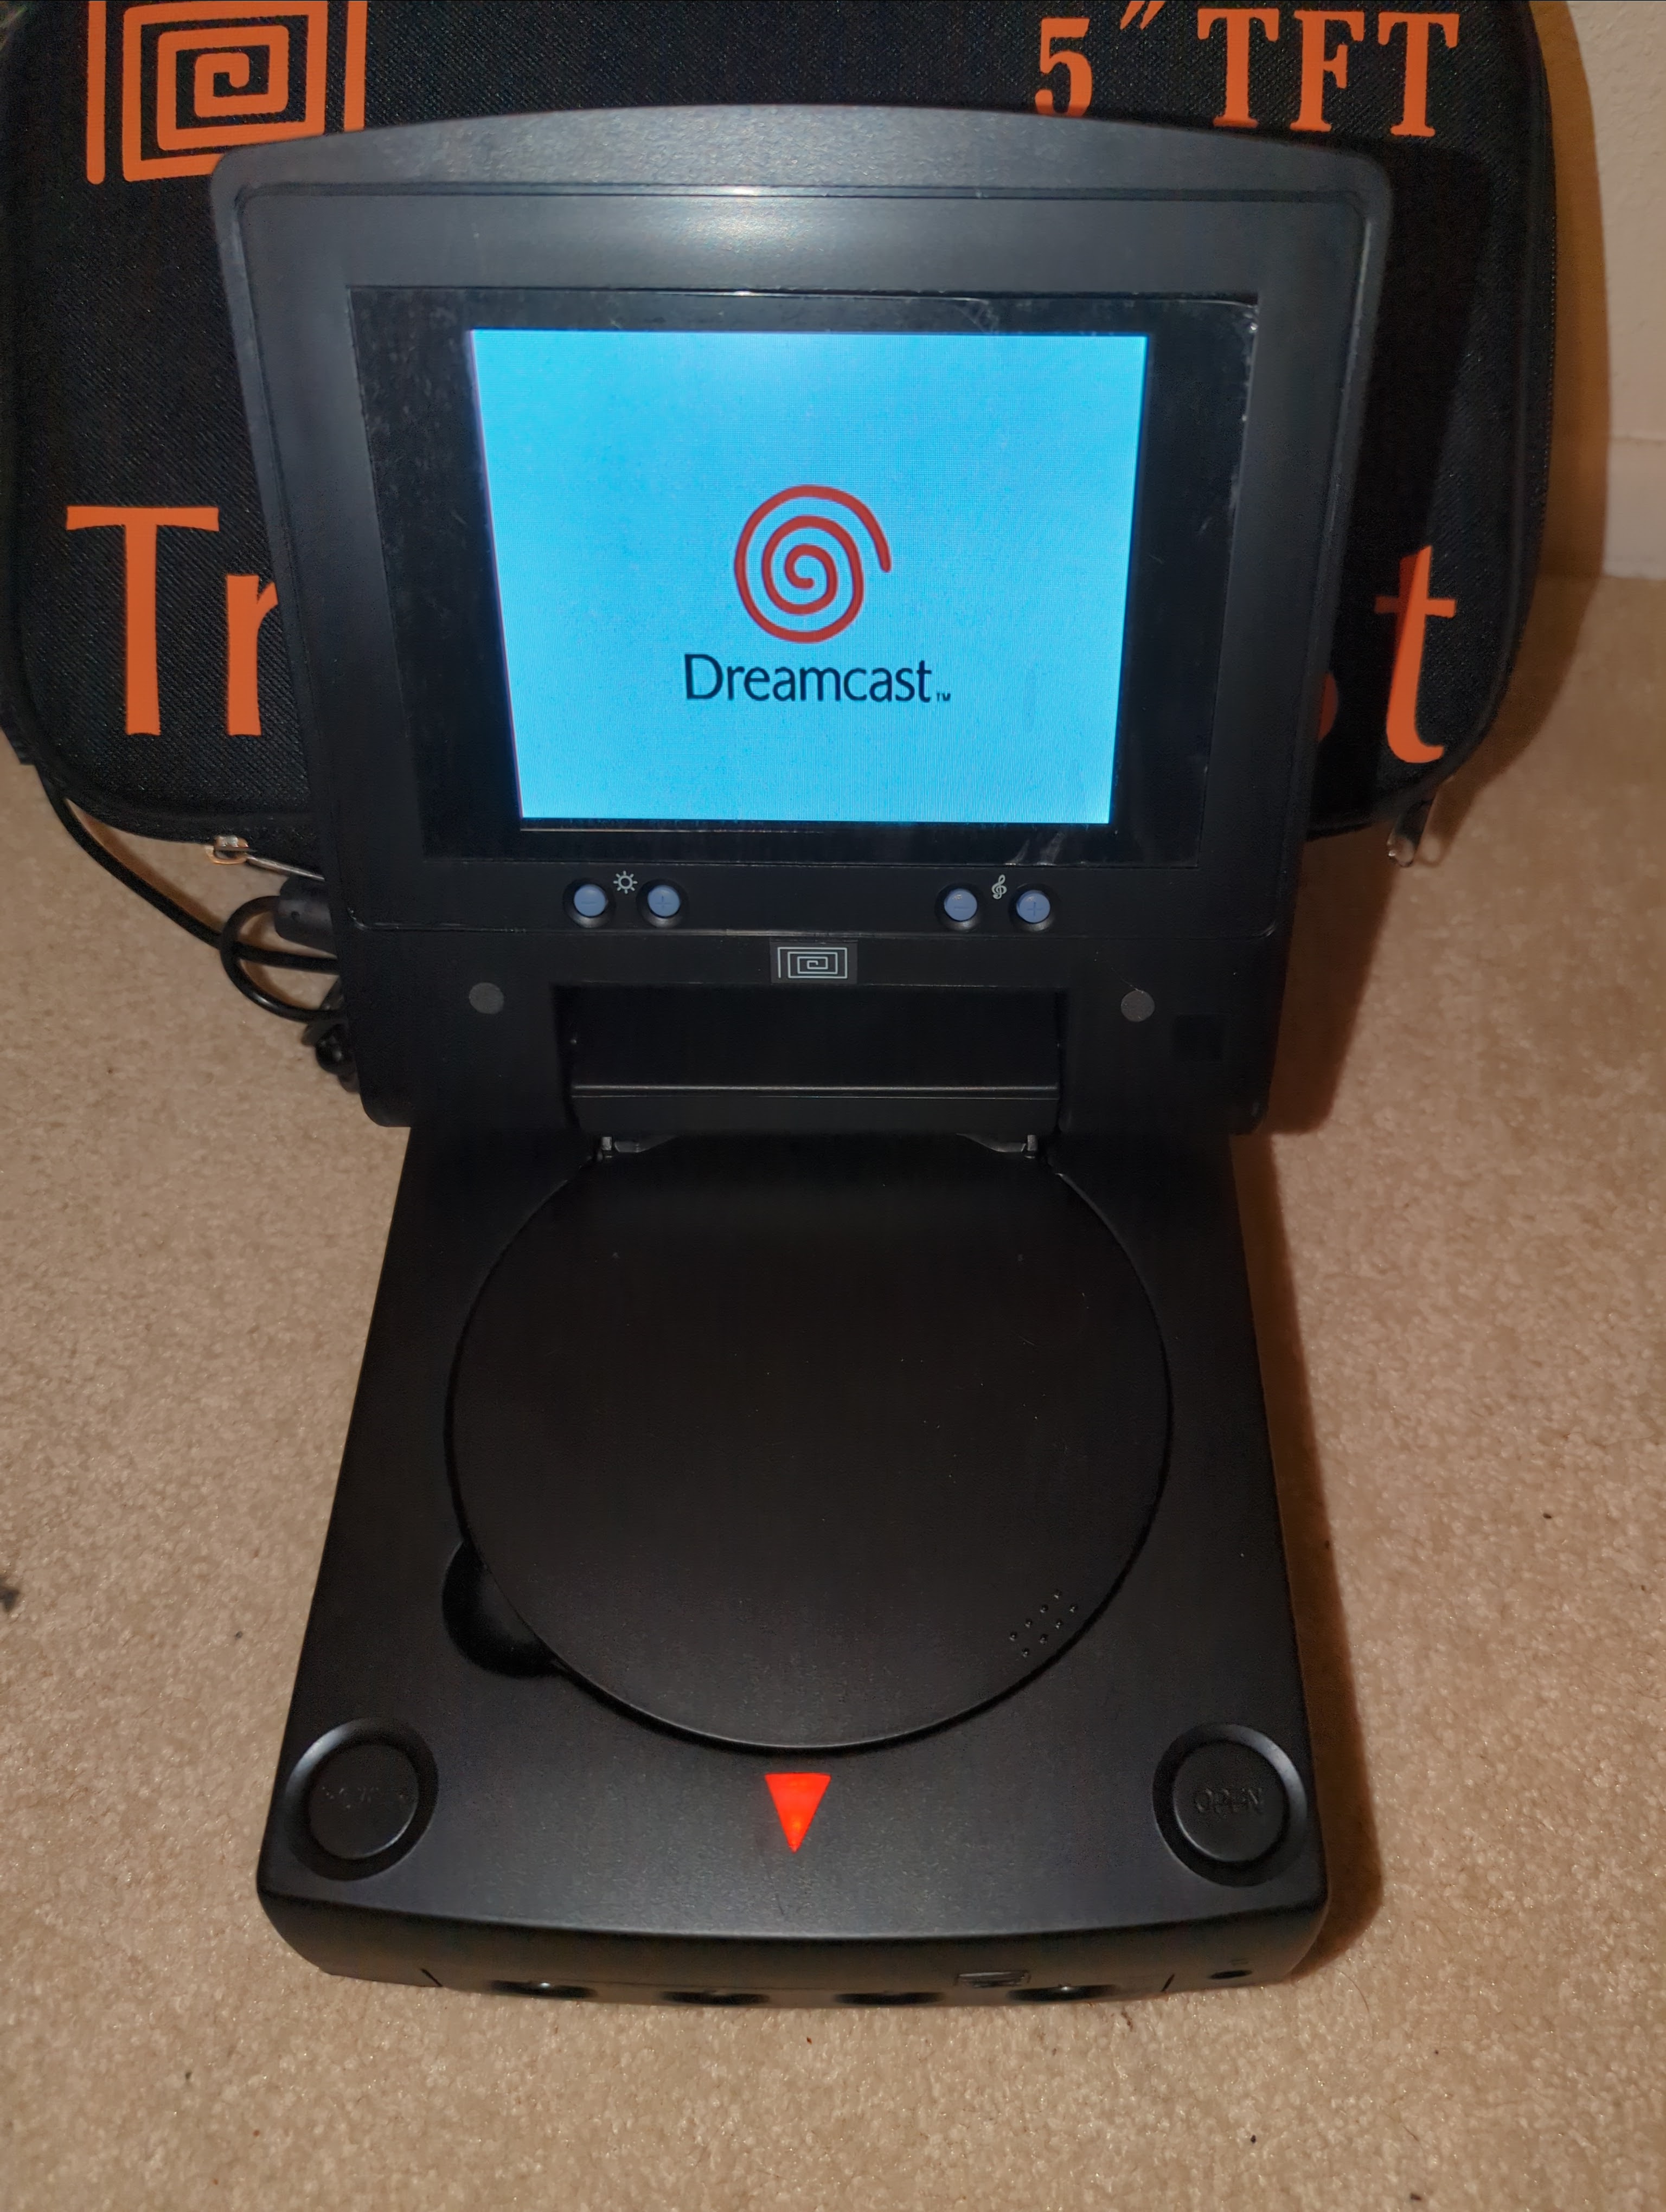
To compensate, you can adjust the potentiometer on the laser pickup that determines whether a pit or land is being detected by the photodiode. This is a fiddly adjustment, so before we go spinning our wheels on bad discs, let's get out one of my Dreamcast-adjacent systems, the Treamcast. Oh, Sega hated these. Basically a mod, the Treamcast took Dreamcast hardware and put it into a special case, here the high-end SE variant with a black case and 5" TFT LCD screen. All of these were ripoffs of the PSone. It still had the video connector and the screen could be turned off, but it also had a built-in speaker and an external power supply so you could play it in the car if you wanted to (mine has a 12V attachment and a matching black controller). What really riled Sega was the altered BIOS that would play pretty much any game without the need for hacks like MIL-CD or Utopia, and they played whack-a-mole with various Chinese and Hong Kong sellers for a good couple years. The only thing I don't like about the Treamcast is that nothing fits right on the expansion slot because the case is smaller; otherwise it's a fabulous portable console. In fact, it's my most powerful on-the-go SuperH system, even more than my HP Jornada 690 (a particular irony since some DC games are based on Windows CE).
You can see this Treamcast is pretty much mint, even with the plastic protector still on the screen, and that's on purpose: it's not just a collector's item, it's our comparison unit because its laser has hardly been used. If a disc doesn't work here then it won't work even after good adjustment on the other one. Crazy Taxi played (and SoulCaliber), but one of my homebrews was damaged (I later noticed a gouge in the disc), and a couple others behaved adversely, probably due to marginal burns at the time or bad media. Armed with a knowledge of what should work, let's start on the pickup.
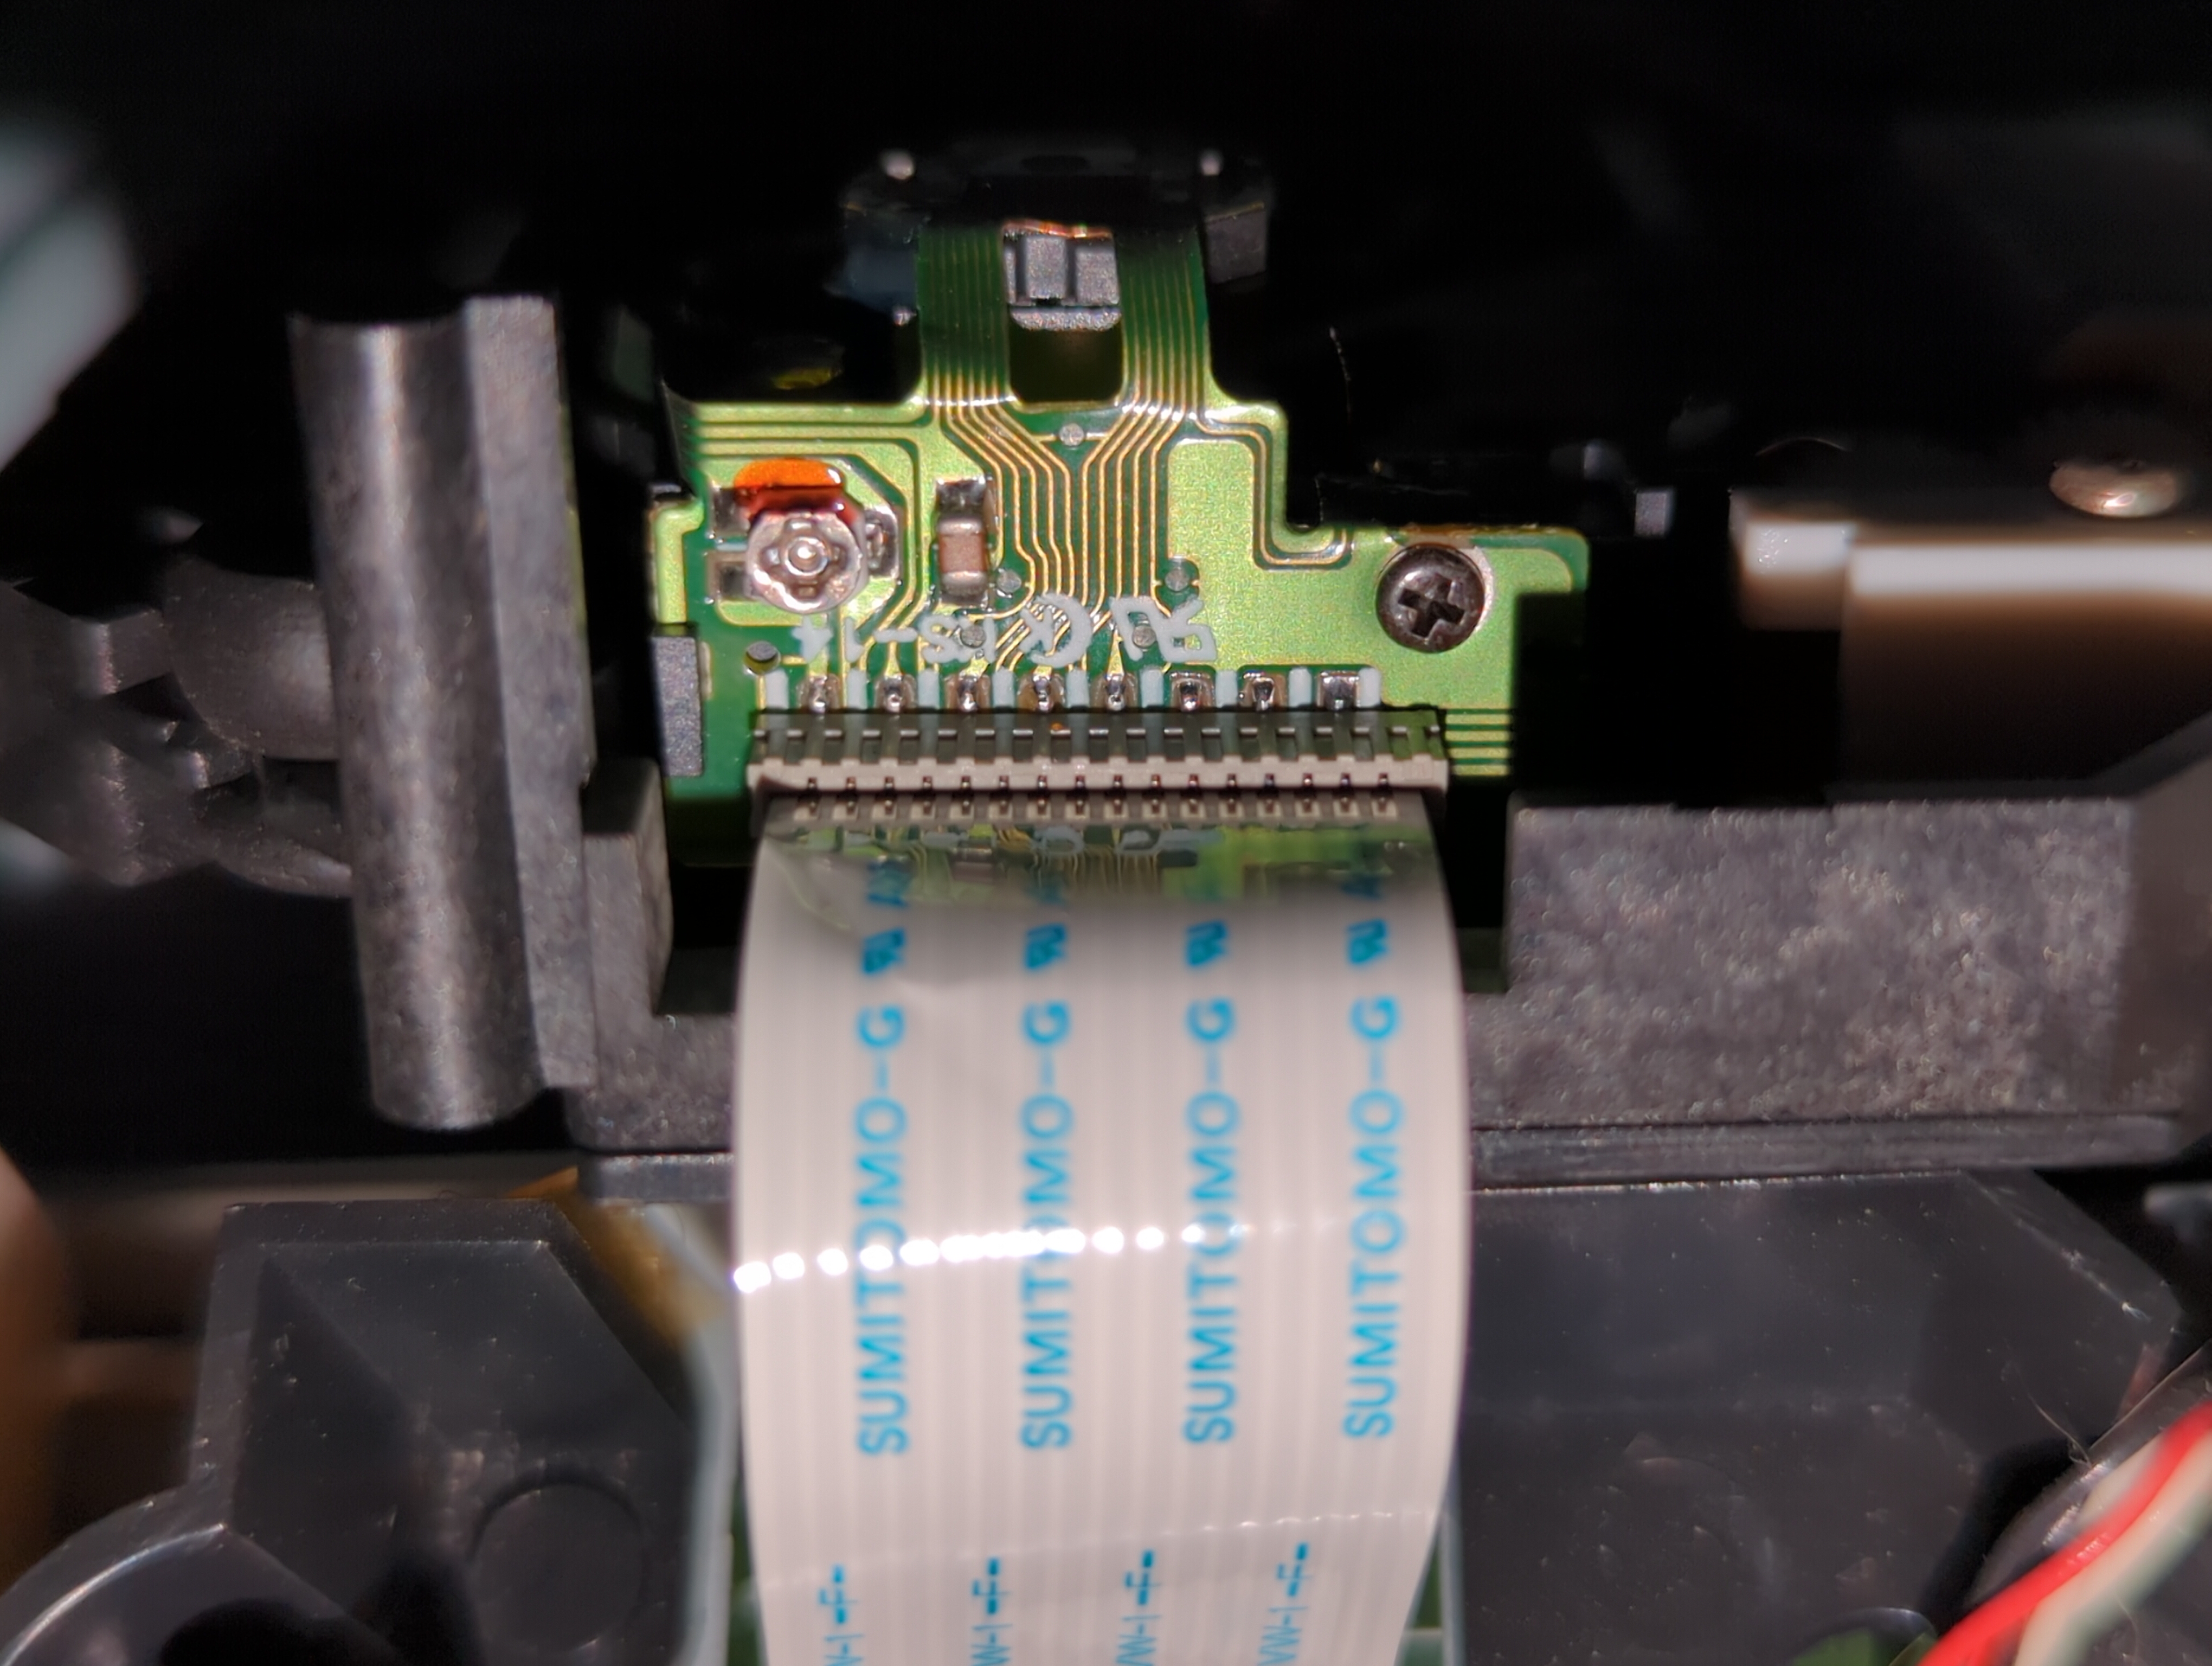
To get to the pickup actually doesn't require any additional screw removal. The black plate with the spindle and the pickup basically floats on seals and lifts right up out of the GD-ROM assembly as one piece. Before we do that, though, we will carefully push the laser pickup all the way click click click click to the back of the unit to give us more clearance.
You'll also find this task easier if you pull the wires out of the wire guide near the blue ring. You can leave the other guide alone.
Carefully lift the black plate out of the unit and flip it towards the back. If you did this right, you should be looking at the underside of the pickup. A ribbon cable exits it (careful: reinserting it is a pain). This is a 2x zoom, so you're actually looking at a pretty tiny part. The little silver "screw" with a dollop of red lacquer on top is the potentiometer we need to adjust.
Before continuing I strongly recommend noting the current resistance setting with an ohmmeter. I don't know what these usually run; I'll just tell you that mine measured about 720Ω.
What we'll be doing is adjust this tiny pot just enough by lowering its resistance so that more discs will read. No, this is not a permanent fix, yes, you'll have to do it again probably, and no, once it gets to zero there's nothing else you can do but try to replace the LED, but until then you can buy more time. Don't reduce it too much or you'll compound the issue, but at least you measured the initial resistance, so you can set it back, right?
As the pot faces you, turn it very, very slightly clockwise, no more than a couple degrees. I used a 5/64" jeweler's flathead screwdriver for this. If the pot doesn't want to turn, you may need to scrape some of the lacquer off with a small pin or another tiny flathead driver.
Then turn the black plate with the pickup back over into its resting place. You can pop the cover back on or leave it off if you're okay working next to the power supply (if you leave the cover off, use something like tape or something hooked to pull the leaf switch in the back down or the Dreamcast will think the drive is still open). See if it reads. If it doesn't, take a reading with the ohmmeter so you know where you are, and if discs that previously read before don't read now, you may need to increase the resistance again (counterclockwise).
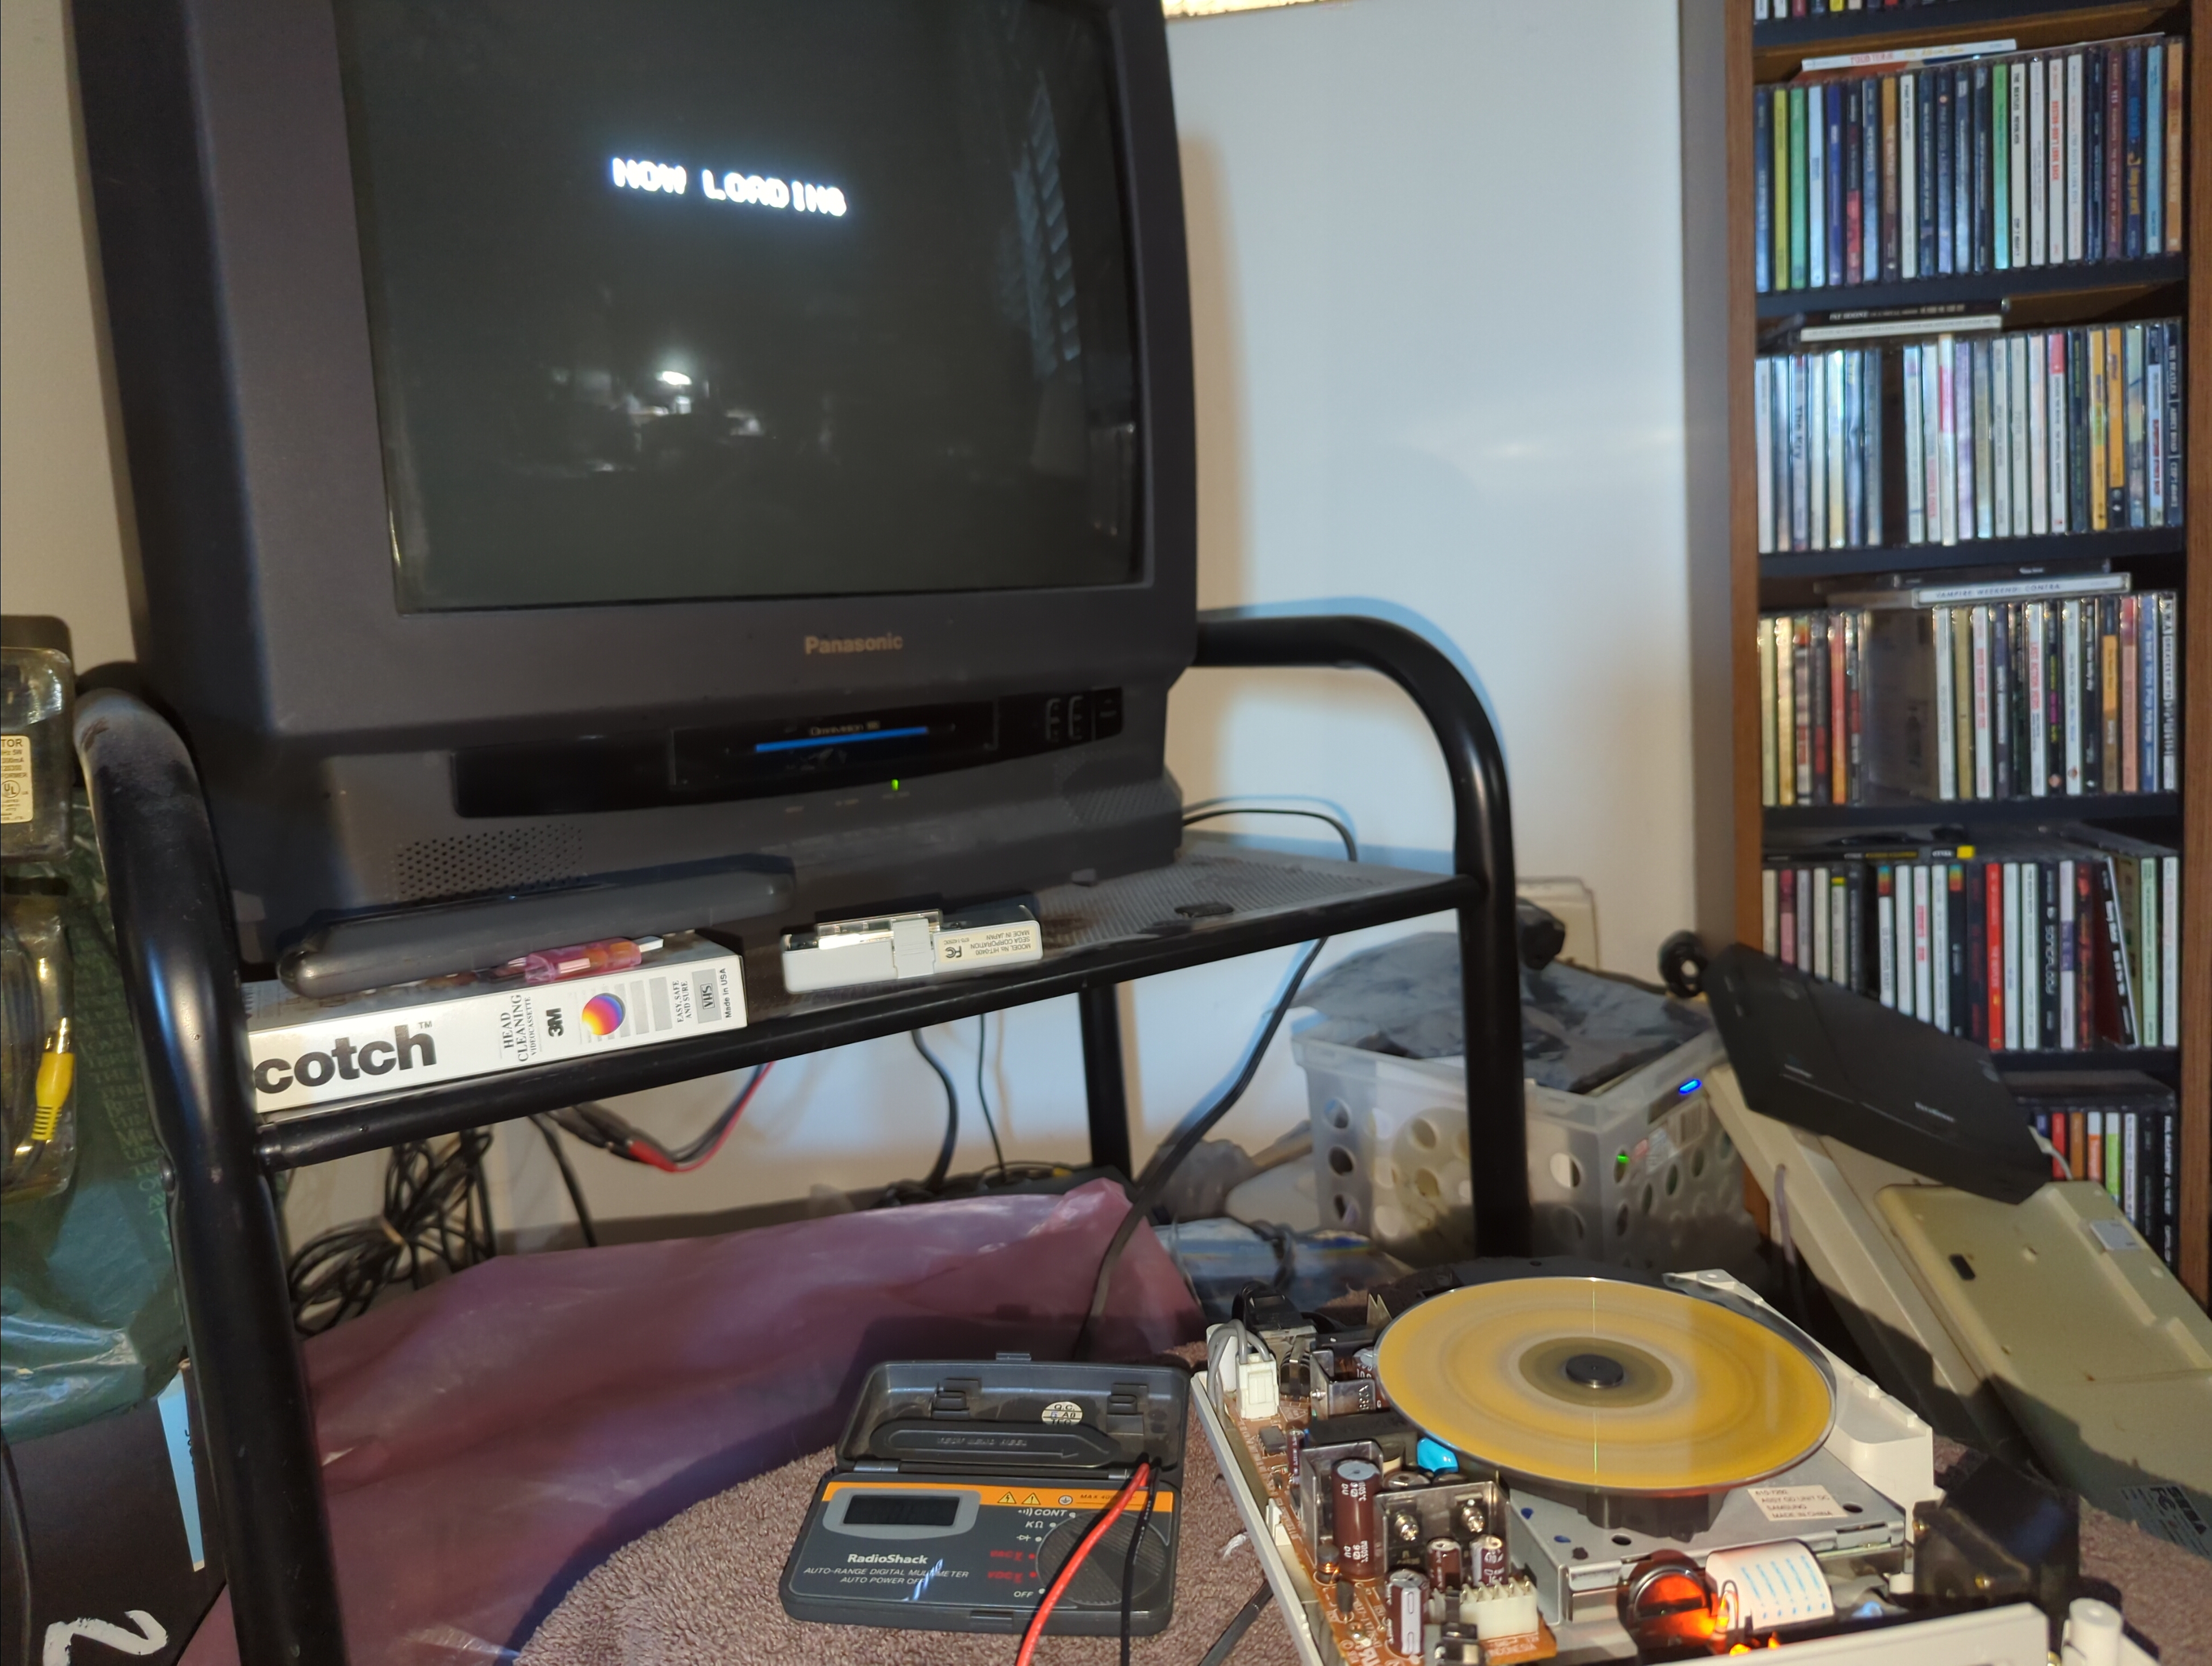
This is a tedious process of trial and error, but this is the first time I've had to do it on this 22-year-old unit, so hopefully it will be a few years before I have to do it again. My reward is seeing Crazy Taxi "NOW LOADING" (though I had to make a tiny tweak as its load times were still too long). For a turn of about 15 degrees, I ended up reducing the resistance to about 400Ω, so assuming the LED's loss of power is at all linear I should still have a decade and change yet on this pickup. :)
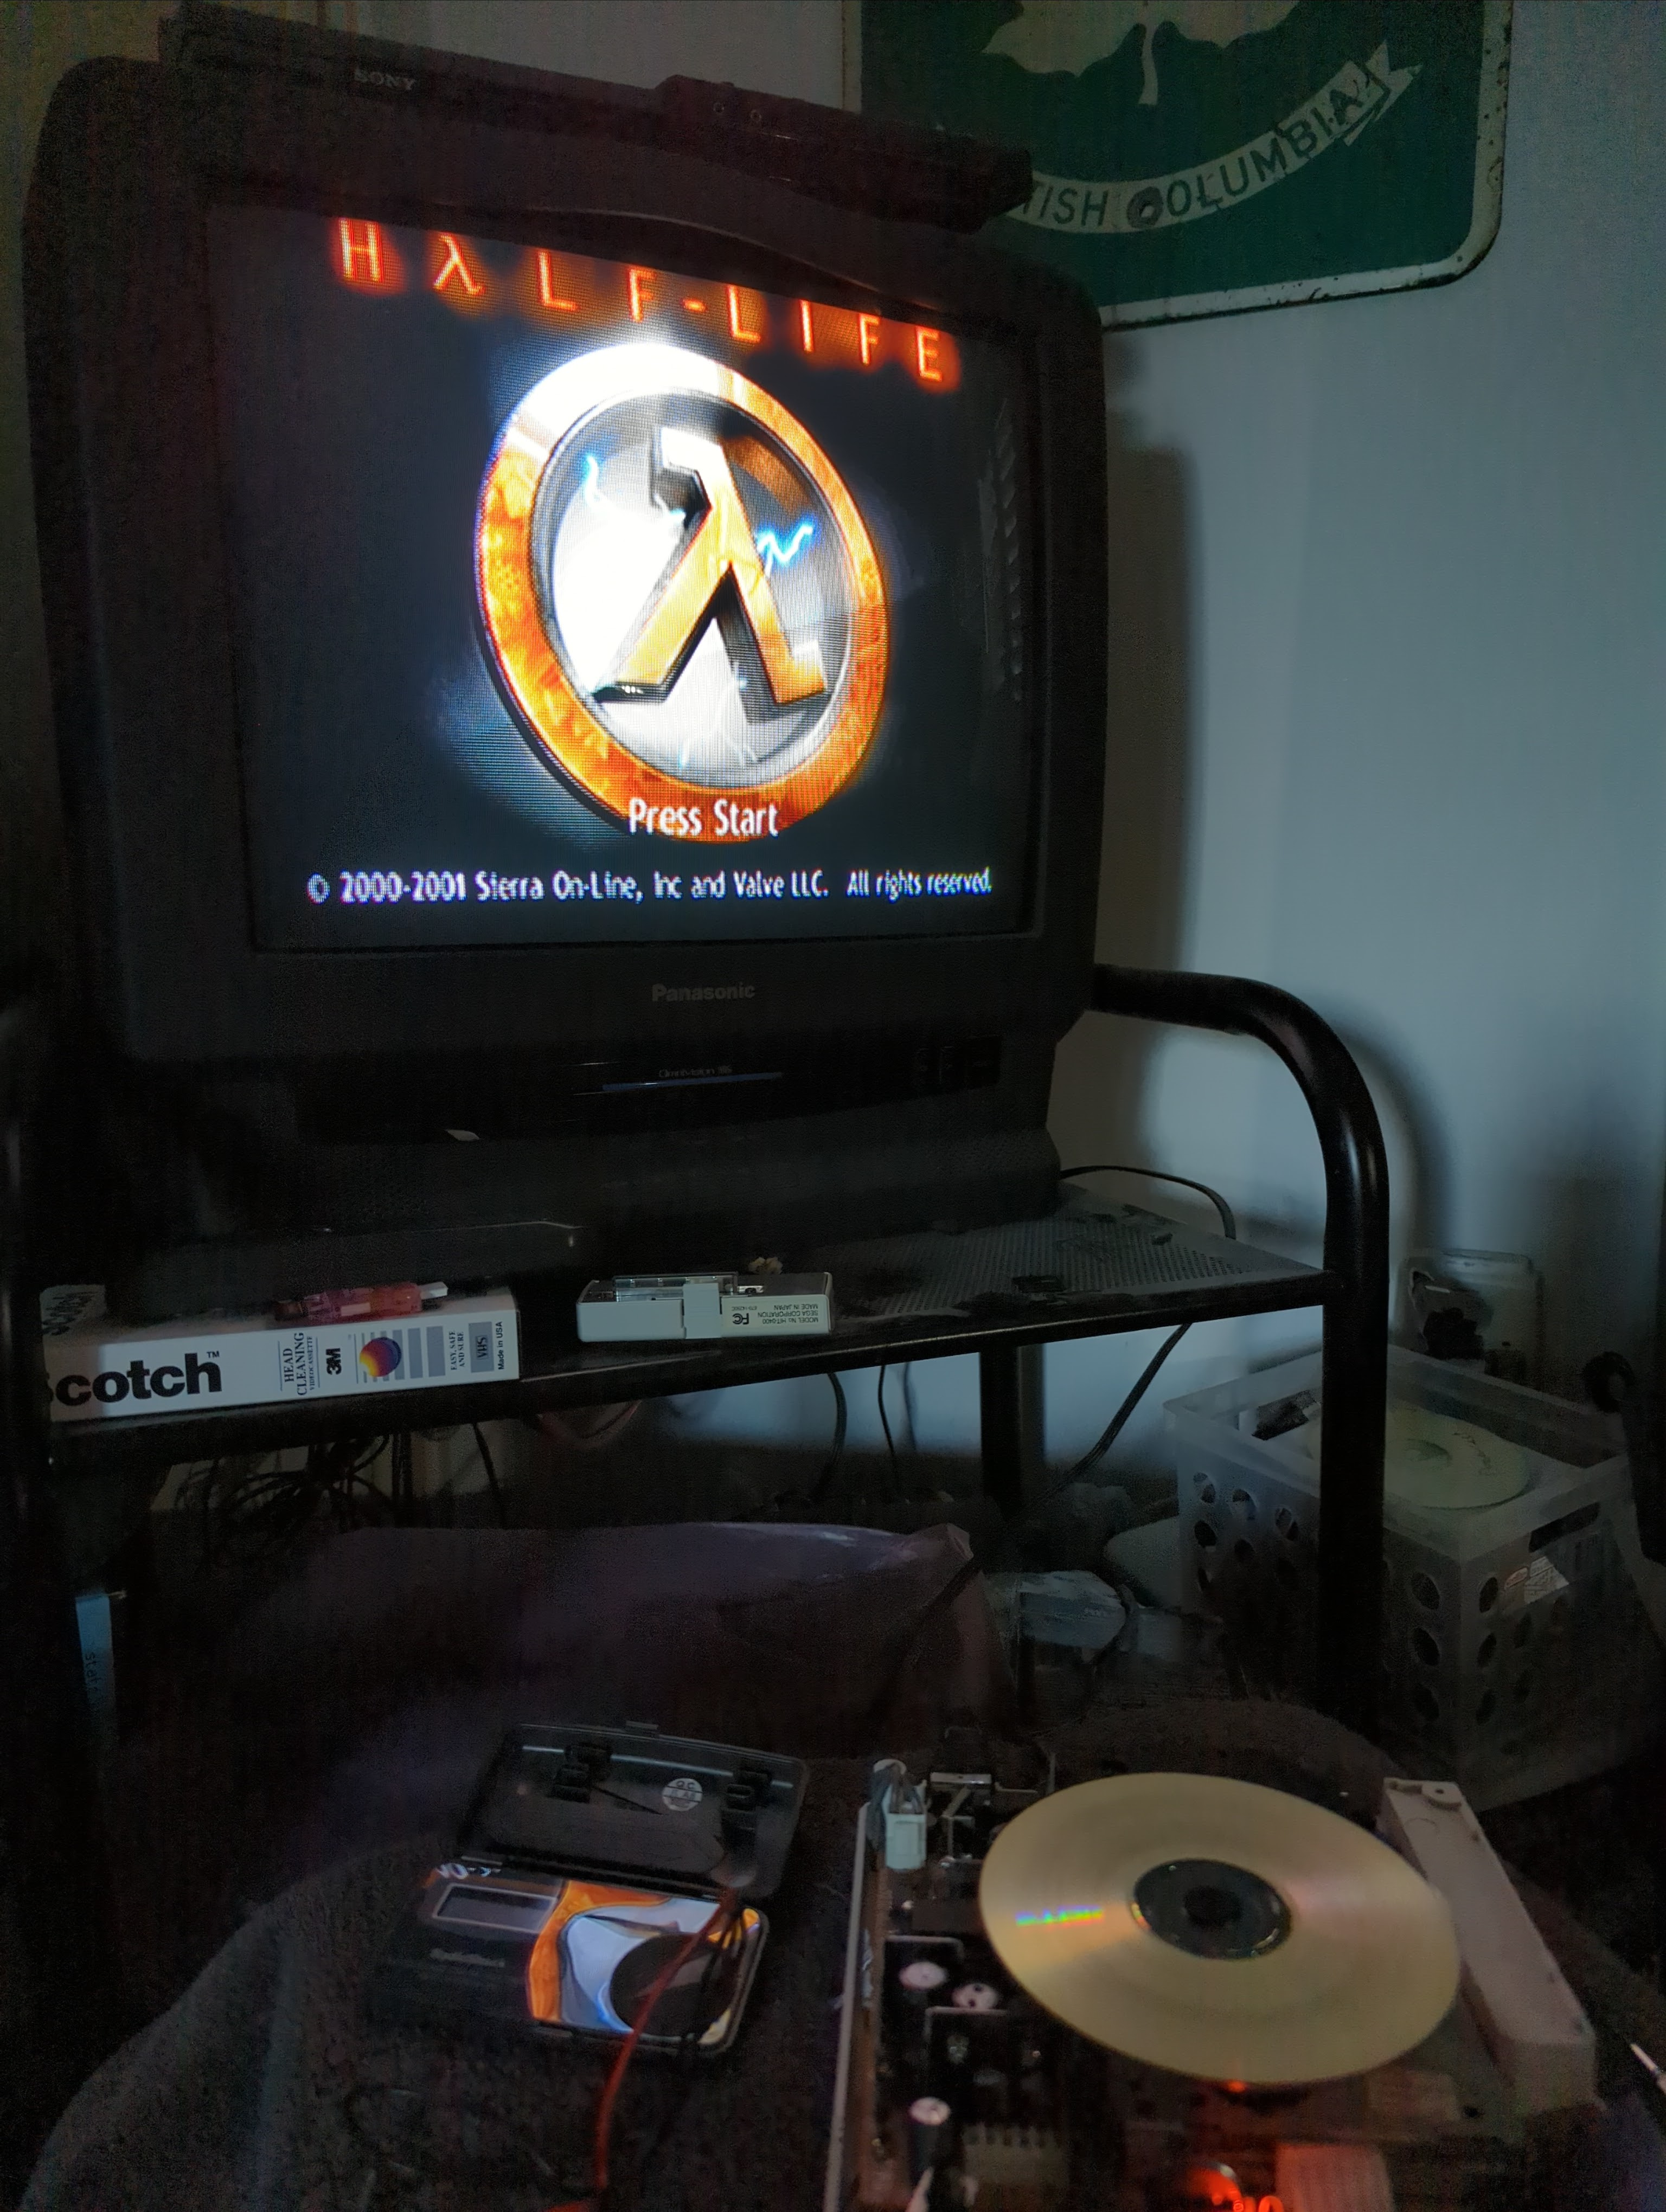
Even my collection of unreleased games booted fine from CD-R. Yes, Half-Life existed for the Dreamcast. It's a pretty good port, too, and even included Blue Shift, but it came out in 2001 and Sierra cancelled it thinking it wouldn't sell. (I'd also love to see the unreleased Logicware Mac OS 9 version if Becky Heinemann still has it floating around her desk.)
Cleaned up and next to the old VCR for a round of Crazy Taxi for old time's sake. The Crazy Taxi ports just don't have the same feel to them. Plus, getting the console back in working order is a prerequisite for a homebrew project I'll be talking about soon, so stay tuned (after I drop off this guy at Tower Records).


No comments:
Post a Comment
Comments are subject to moderation. Be nice.