Ah, the last and mightiest of Apple trying to have it both ways: the 1995 PowerBook Duo 2300c, and the only PowerPC laptop in the entire series before Apple canned the line in 1997. It had the Duos' biggest screen, the most memory and disk space, and the fastest CPU of all, yet crammed everything into a 9.5" 640x480 display and an 88% keyboard that feels like typing on a bouncy castle.
But being Apple's smallest laptop — even today the Duos are still the fourth smallest, width-height-wise — wasn't the (main) point of the Duos. Arguably, the main point was the Dock. Even Jerry Seinfeld had one.
With the Dock, your little, relatively underpowered laptop was hoovered up into a beige plastic maw to make it into an average-sized, somewhat less underpowered desktop. But you got slots and ports and the ability to use it like a desktop computer — two computers in one! — and that was crucial because without any Dock, even the smaller Mini and MicroDocks, you had hardly any ports at all (MacBook Air has entered the chat). Docking was so important that Apple even intentionally gimped the 2300 by keeping the 100MHz 603e on a 32-bit bus to maintain Dock compatibility. Yet because Duos were irrepressibly cute, they turned up in
many other TV shows and even movies, most notoriously
Hackers:
(People hate on Kate Libby's offhand comment that it has the new "P6 chip" especially when the trackball gives it away as a 68K Duo, but allegedly the unit in the film had a 2300 logic board, Apple did call the 60x series "P6" in some marketing material, and the "28.8 bps" [sic] modem did at least exist as a prototype. The greater technical sin is Dade Murphy saying it has a PCI bus even though no Duo ever did; the first PowerBook to be PCI was the 3400.)
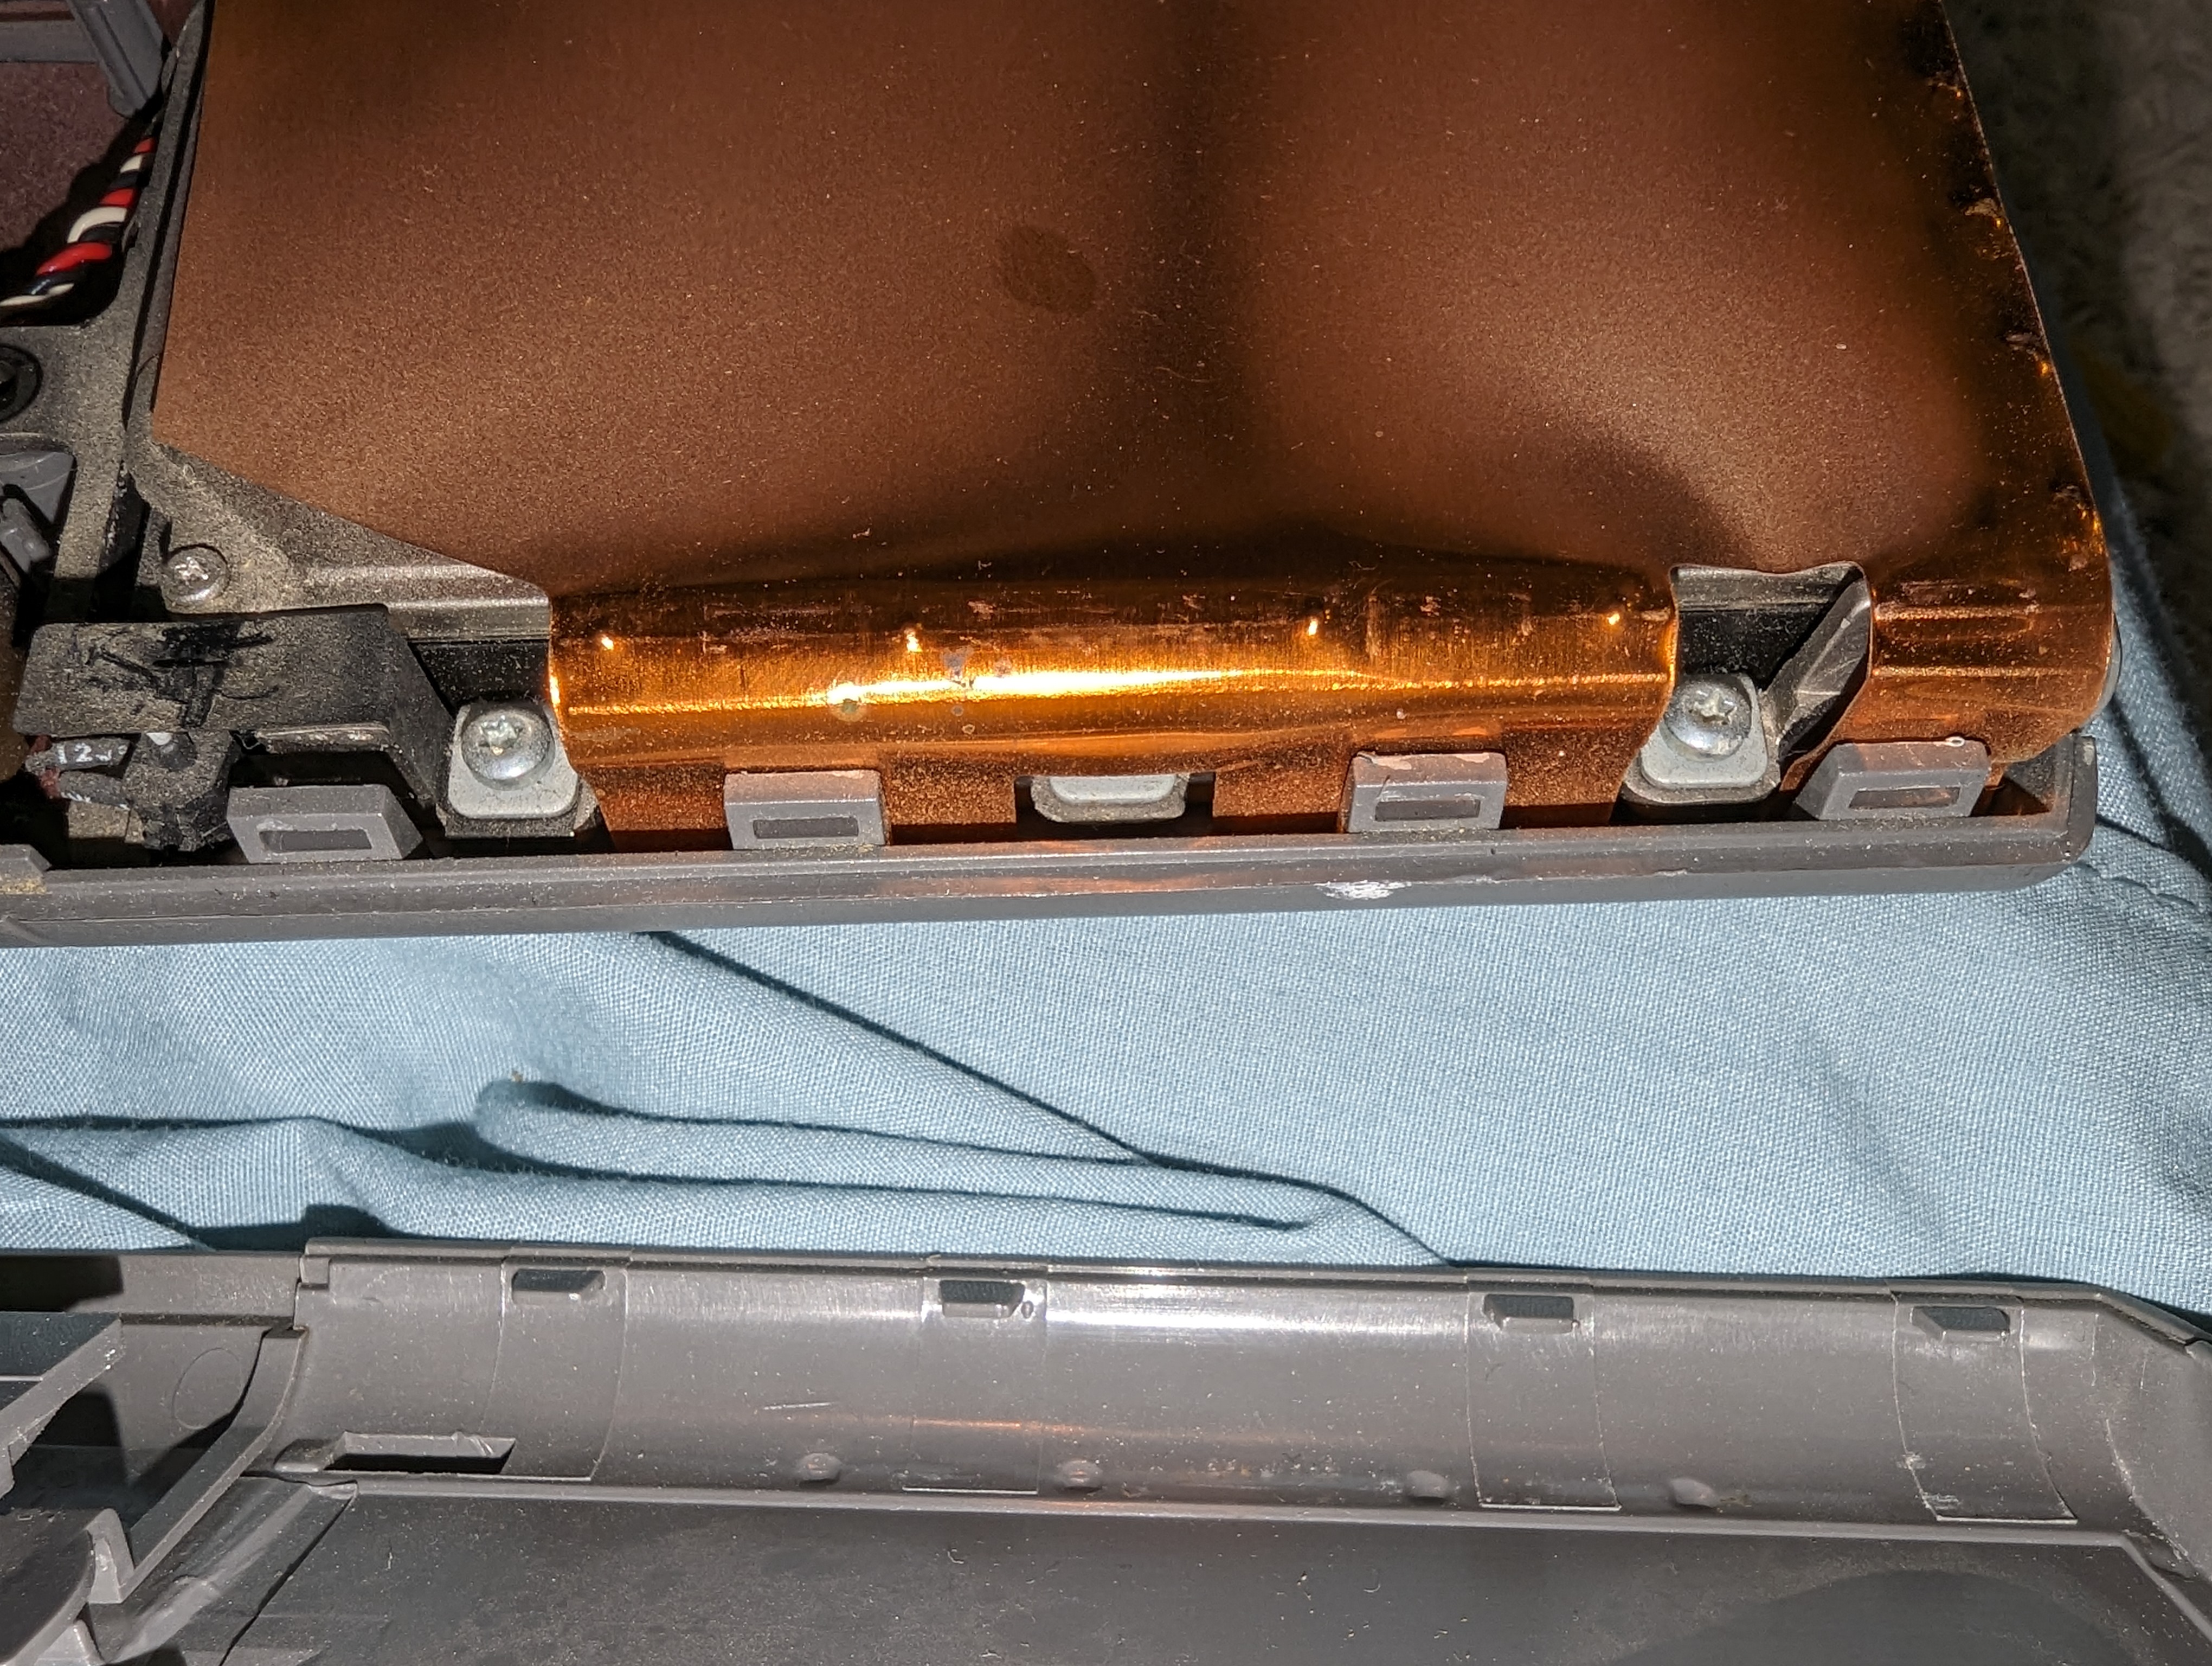
Unfortunately, one of my two 2300c systems is showing evidence of the same problem that ruined the front of
my favourite PowerBook 1400: the metal hinges are starting to tear out of their attachment points in the plastic back of the display, and naturally it's the one with all the upgrades in it. The most common symptom, besides bulging or split hinges when the display is closed at the point where the back and front come together, is the bottom front bezel cracking from the strain as you open it.
If you learn one thing from this blog post, when opening pre-G3 PowerBooks, place your thumbs on each side of the bottom bezel of the display as you open them to support the hinge attachments. It's time for a Refurb Weekend.
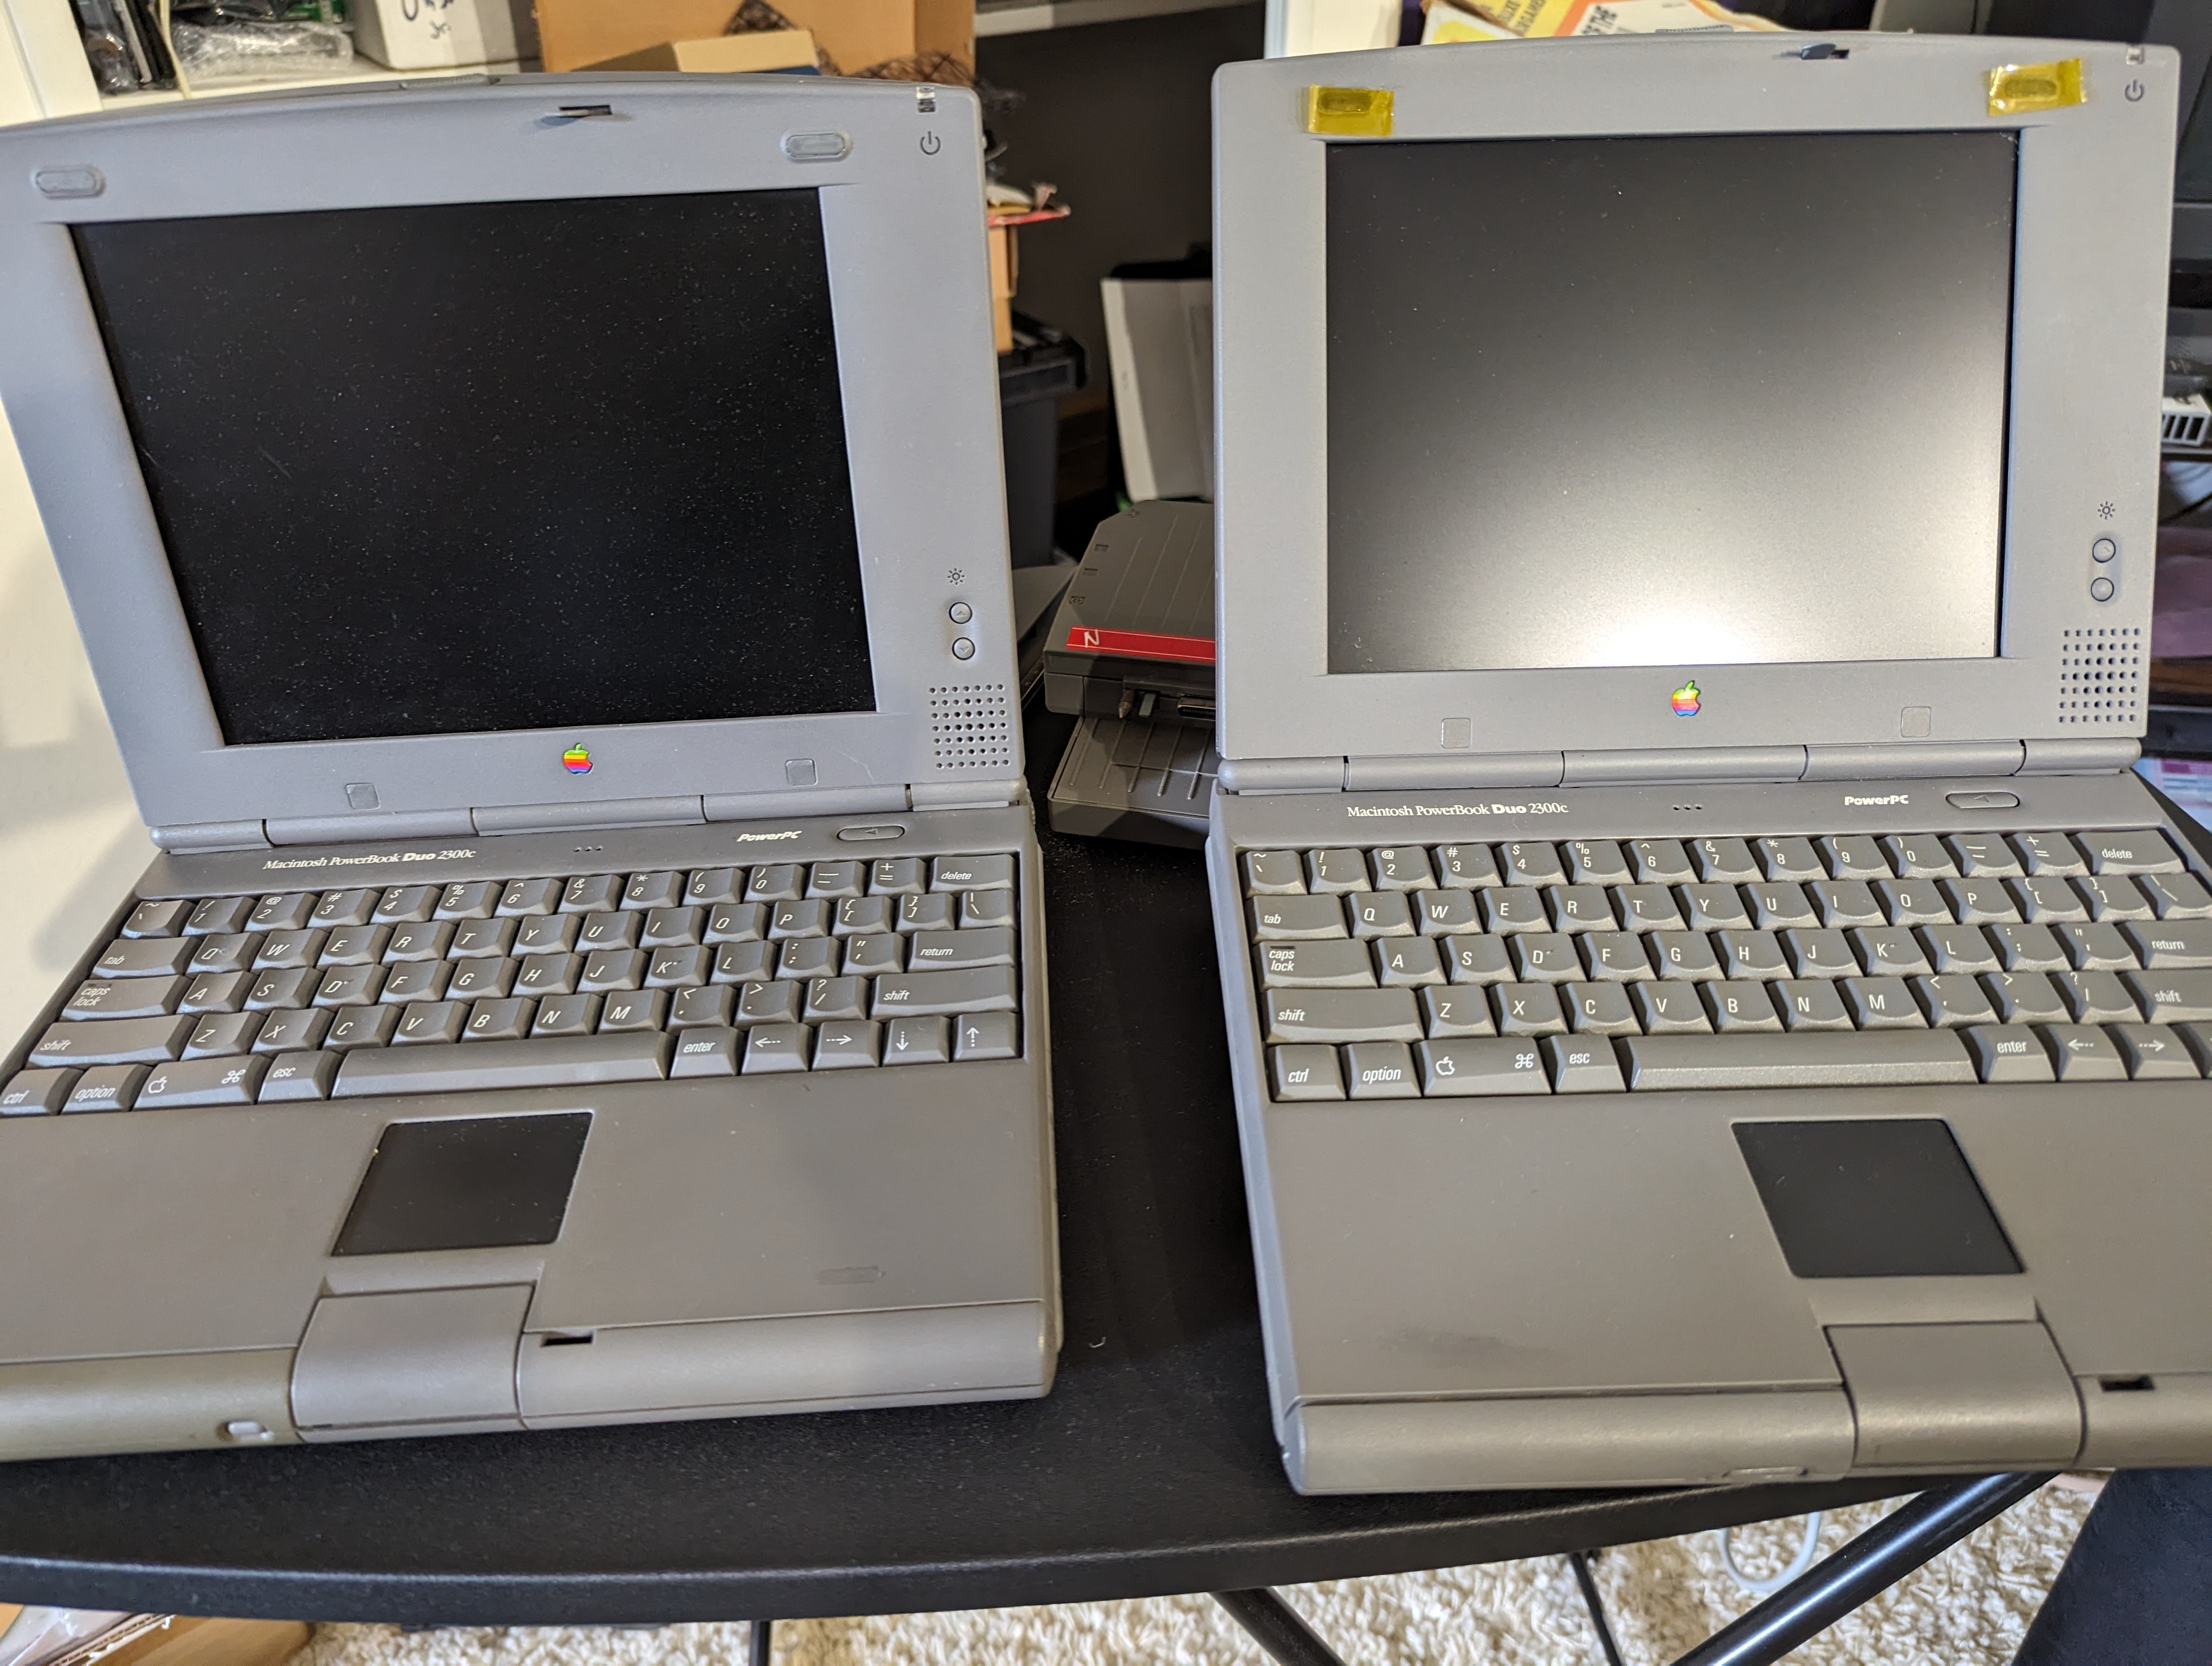
Meet Jerry and Kramer, because
Seinfeld. The Kapton tape on the display spacers is to deal with that
other scourge of PowerBooks (other than, controversially, capacitors), namely degenerating rubber that has already marked up the lower half somewhat. Jerry is the one with the cracked bezel, but also the one with all the upgrades. In fact, it's a fully loaded system, and near as I can determine the most powerful Duo configuration available, with a maxxed-out 56MB of RAM (up from the factory 20MB), 14.4kbps modem and a 1.1GB ATA hard disk. Apple sold the 20/1.1 with modem for $4700 in 1995, or about $9400 in 2023 dollars.
On the other hand, Jerry also has a bad LCD pixel column (this was before the crack happened) and Kramer has a perfect display, because Kramer. Both run Mac OS 8.1. The 2300c is the last system Apple made using aspects from their former Snow White design language despite being PowerBook grey.
Those upgrades are important, because without a Dock, you have exactly two ports: the phone line — assuming the modem is installed, that is — and a combined modem/printer port, both cleverly concealed behind rotating covers that double as a stand on your desk. This is enough for LocalTalk, but you'd definitely not want to be installing software over one. You don't even have a way of connecting a floppy disk.
Otherwise, the other items visible are the power supply connector (this can use anything from an original Duo 24V/1.5A supply to the G3 24V/1.87A one, but read on for a caveat), the power switch (useful when it needs to be reset or forcibly powered on or off), and the big long 152-pin Dock connector, which has a sliding door to protect it. The Dock can be thought of like the Processor Direct Slot on '030 Macs, and maintaining compatibility required the LC040-based 280c and the 2300c to implement the same type of bus.

I used to have the full-size Duo Dock like Jerry, which gave you two NuBus slots for things like Ethernet or video cards, a floppy drive, an additional hard drive bay, optional 68882 FPU and L2 cache (not in the Duo Dock Plus due to incompatibility with the 280c and 2300c), and a slot for more video RAM. However, I had only an original Duo Dock which needed a refit for the 2300c, it had bad capacitors and wouldn't actually load any units anyway, and in practice I always used the Duo as a laptop and never as a desktop, so I passed it on to someone who was going to try to repair it. Also, a Dock this size is too beefy for the Duo 1.5A supply.
But there were all sorts of other smaller Docks which served as port expanders, including from third parties. My preferred one is naturally the Newer Tech UltraDock 16sce, which balloons into audio, monitor, Ethernet, 25-pin SCSI (not PowerBook HDI, very convenient), ADB, floppy disk (using its own HDI connector, not the usual "DB-19") and power. The 16sce was never cheap — $499, roughly a cool grand in 2023 — but remains particularly sought-after by Duo enthusiasts and you should expect to pay similar money for one today. This dock also needs a bigger power supply, but the one from my PowerBook G3 or my PowerBook 1400 (both 1.87A) works fine. An alternate power switch is conveniently on the side since the unit blocks almost the entire back except for the serial and modem ports.

If you didn't have the green or needed something more portable or less power-hungry, there were smaller port-expander Docks, though in spite of Apple's gimpage not all of these worked with the 2300c. NewerTech made a smaller MicroDock series that provided ADB and your choice (just one) of Ethernet, external video, SCSI or floppy connectors, the latter being essentially a clone of Apple's own Duo Floppy Adapter shown here. eMachines also made a similar EtherDock of their own but it only works with the '030 Duos.
The eventual goal will be to completely rehabilitate the display back, but today our immediate concern is to produce a fully working system where its display is presumably less compromised. Ignoring the philosophical implications of Theseus's ship, we'll build a composite "NuJerry" using its memory and hard disk but in Kramer's chassis using Kramer's intact LCD and housing (Jerry's a real fancy boy), and christen the remaining body parts of Jerry as "NuKramer" for rebuild later.
Like every laptop teardown, we'll start with the battery and keyboard.
The 2300c service manual is mostly helpful but assumes more familiarity with the device than modern users likely have. For example, the sliding battery door is actually
part of the battery: press the button, slide the door to the side, and pull the whole thing out door included. Only the battery in front holds a charge, so we'll give that to NuJerry too.
Next we get out our Torx T8 screwdriver (fortunately all the screws we'll need to remove for this are T8s) and remove the four screws from the base. This liberates the keyboard.
Turning the laptop back over, carefully open the display (your thumbs are on each side of the bottom of the display bezel, right?) and pull up the keyboard with a nylon prybar or similar.
Unlike the 1400, the CPU is not on a daughtercard and most of the components are covered by a layer of Thermattach T-Wing thermal tape made of copper foil between two non-conductive polymer sheets. (I don't know why the previous owner put paper in there. I took it out.)
The T-Wing tape conducts heat to the big metal CPU stiffener (the frame) as a terminal heatsink, as does the 603e, which is under the square metal tab of the stiffener in the back of the unit next to the display cable. This sheet doesn't adhere to any of the components we'll be dealing with, so we can safely lift it up to work as long as we put it back.


Also unlike the 1400, the RAM on the 2300 was not stackable; you could only install one card at a time (recall that the 1400's RAM form factor could allow multiple RAM sticks to be put on top of each other). In Jerry, the 48MB module appears to be stacked but it doesn't look like they were ever sold as separate parts, only as an item. In Kramer, there is only a 16MB module. Combine this with the built-in 8MB on the board, also unlike the 1400 in that the 2300 has the base RAM soldered on, and you get the 56MB and 24MB present respectively in each system. Apple sold RAM upgrade kits at typical Apple prices but both of these cards were third-party. We'll look at them a little later.
Above the RAM is the daughtercard for the 14.4kbps modem with its own logic board connector. As with most Rockwell chipsets of the era, the Rockwell RCV144DPL that powers it embeds a high-speed Rockwell R65C02 core. Unlike the RAM upgrade, however, installation required removal of the CPU stiffener and would definitely have voided your warranty. In systems without a modem the off-on board is here (the modem card contains that functionality).
This minor amount of disassembly is enough to swap the RAM but we need to also get to the hard disk, so we'll free up the keyboard and continue onto removing the top case of the bottom half.
Using the tip of a nylon spudger or very carefully with a small jeweler's flatblade, open the compression connectors for the keyboard cables by lifting up the tabs on the side and slide out the two keyboard cables.
Next, use the end of the spudger to flip up the little yellow tab connecting the track pad (the cable under it is the ATA hard disk). Incidentally, if you like the 68K Duo's trackball better, you can just swap one in for the trackpad; the 2300c is completely compatible with it.
Now we need to remove the hinge covers on each side.
Only use a plastic or nylon prytool or spudger! The service manual improperly suggests using a jeweler's screwdriver but using anything metal will bend, mar or break the plastic! You will note taking them off makes the hinges bulge somewhat worse because they help to contain the damage, so be very careful with the display at this point. The covers will slide off to the side with some gentle force.
The top case (of the bottom half) fits into the removable rubber bumpers on each side. It attaches to the bottom of the case with this snap shown here in the battery compartment and four hidden interlocking tabs. This macro shot makes the snap look further back in the compartment when it's just inside the front.
Lift the tip of the snap off slightly with the edge of your spudger and the left side of the top case should pop up. Wiggle the top half (back by the display) of the top case with your fingers or the spudger enough to worm out the rubber bumpers on either side and remove them.
The four interlocking tabs that remain are not well explained by the manual. In particular, they are
not these (so don't try prying them). Also don't try wedging anything into the little hole where the display lock clips; all you'll do is damage something. We'll meet the little flap of metal in that hole when we get to removing the hard disk.
Instead, what you'll want to do is try to slide the top forward at the same time you're pushing the bottom back. The interlocking tabs don't have clips and are just a friction fit, so as long as you slide the two halves apart squarely, the top case will eventually separate.
And there they are, with the top case off. Put it aside.
In this view we can also see the PRAM battery down below (a much easier job to replace than on the 1400, admittedly), the battery compartment, and the hard disk under a thick metal EMI shield.

If we lift up the corner of the T-Wing sheet, we can see some of the ICs. Here we see the 341S0025 PMU (power manager) embedding a Motorola 68HC05 microcontroller, the 343S0180 "Whitney 3" that interconnects peripheral devices between the system and I/O busses, and an unknown module sticking up through a hole in the sheet labeled "BI 9530A 157S0174" that is likely part of the power circuitry. The 603e (Motorola XPC603EFE100MF) is under the stiffener, and on the other side of the logic board is the Chips & Technologies T65220 video chip (which Apple calls the CSC "Color Support Chip"), the 343S1159 "Baboon" IDE controller, and the 343S1194 "PBX" memory controller and bus bridge, the chip that actually does the conversion between the 60x processor bus and the 68030-compatible I/O bus. A separate "Combo IC" combines the Zilog Z85C30 serial communications controller and NCR 53C80 SCSI controller. Although internal SCSI drives are supported, Apple never shipped one for the 2300.

The combined IDE and power cable comes out with the edge of a spudger. The connector nearby is for internal SCSI devices.
The two Apple hard disks Apple sold as BTO options for the 2300, the 750MB and 1.1GB respectively. The top (in this view) screw holds down the EMI shield. Remove that, fold back the metal shield, and remove the two other mounting screws. These are also all T8s.
Switching drives; don't forget that the back mount screw holds down the metal EMI shroud around the hard disk. One of the two front screws also holds this metal flap, which is part of the switch that detects when the display is closed. Make sure to reattach it so that it's properly over the little plunger-type switch underneath.
Now for the RAM. This connector is quite snug and needed a little careful wedging with the spudger to push it off.
Like the 1400, there were third-party RAM cards. Both of these units had one. This is the smaller 16MB part.
The big 48MB unit, obviously a 16MB sandwiched on a 32MB, has a secondary connector but this doesn't appear to have been standard nor sold separately. This was manufactured by Viking.
The RAM and disks are switched and we've connected the new disk drive, so let's first reassemble NuJerry. The bumpers have notches in them. On the left side, where the snap was, the notch goes to the front (and the snap covers the notch). On the right side, the notch goes to the back.
Then slide back on the top cover into the interlocking tabs, pressing it back firmly and seating it all around the board, including the snap in the battery component. We then reattach the trackpad and keyboard cables and replace the screws on the back. NuJerry powers up and shows its new (old) disk drive and all 56MB of RAM. I did a little cleaning up to deal with the display spacer residue and gently scraped off that blob of white paint, and it's ready to go.
As for the other unit, to avoid further stress on the display we'll continue with the teardown of (what's now) NuKramer and remove its display assembly from the bottom half. The pieces will go into storage until I'm ready to deal with them.
To remove the display connector, the manual recommends an IC extractor because it's big and flat and less likely to bend anything coming out. The downside of this is my IC extractor is metal, so I had to be very careful not to scuff the board. Hook the black frame around the connector and pull straight off.
The manual then says to undo the ferrite bead at the top of the CPU stiffener and unclip the cable with a spudger on the bead's right side to flip it open. However, the ferrite bead is only secured by (now) weakened adhesive, so the whole thing just came off the stiffener in one piece. Hopefully that didn't harm anything.
The next and most difficult part is prying off the center clutch cover without damaging (further?) the display cable rolled in the centre of it. Again: do
not use a metal tool! There are snaps on either side, but the cable runs into the right side of the display, so the best way is to wedge up the
left side and then slide it off that direction. This took several minutes to accomplish.
Finally, T8 encore for the two screws holding the display mounting clips over the display clutches. Remove the screws and the clips, and the display (using the tubular rods at the bottom of the clutches) lifts straight out of the bottom half.
Now with the display no longer under continuous strain, NuKramer is ready for storage and eventual repair. Meanwhile, the Frankensteined NuJerry is slowly installing CodeWarrior Gold 9 from the external SCSI CD-ROM and I should have something fun to show off in a few days if all goes well. There will be soup for you, I promise. (
Why do I always have the feeling that everyone's doing something better than me on Saturday afternoons?)
As for the Duos, the 2300c was the last of the line. Their spiritual replacement was the somewhat larger but more full-featured PowerBook 2400, which ran a 603e at 180MHz or (Japan only) 240MHz on a removable daughtercard like the 1400 but was no longer hobbled by the need for dockability. Instead, it provided a full complement of ports but it too required an external floppy or SCSI to achieve its smaller size, and it remained the only unit Apple made that lacked internal removable media until the MacBook Air in 2008.


No comments:
Post a Comment
Comments are subject to moderation. Be nice.